


The technique of carrying out the deadlift is a detailed description with photographs.
Now our cool workouts you can watch in the video format. Subscribe! [wp_ad_camp_3]
All about why it’s important to include this exercise in your training program.
Use of deadlift.
[wp_ad_camp_1]
The deadlift with the pole is considered to be the most important of the five basic strength exercises. The benefit of deadlift is that it works through virtually every muscle in the body – from the musculature of the legs, buttocks, bottom of the back, the straight and lateral muscles of the press, ending with the muscles of the shoulders and hands. In addition, the deadlift trains the central nervous system.
Unfortunately, beginners often neglect the performance of this exercise, considering it difficult and difficult. The situation is aggravated by the fact that there is no way to “simplify” a deadlift or execute it in the simulator. The only facilitated option is the deadlift with dumbbells, however, on the technical side, its correct execution is even more complicated than usual.
Deadlift with dumbbells: pros and cons.
The logic of performing deadlift is, in fact, simple – it is necessary to raise the bar from the floor. However, everything is not so simple, and the incorrect distribution of the load overloads not only the spine, provoking pain in the lower back, but also puts the joints under attack. At the same time, the more operating weight is used during the exercise, the more even the slightest technical errors can be damaged.
The above-mentioned deadlift with dumbbells has a number of critical drawbacks. First, dumbbells will be located lower on the floor than the bar with pancakes – you will be more difficult to bend, which will create an unnecessary deflection of the back. Secondly, deadlift involves working with a lot of weight – and training with two dumbbells of 30-40 kg each will create a lot of difficulties.
Technique of carrying out deadlift.

[wp_ad_camp_1]
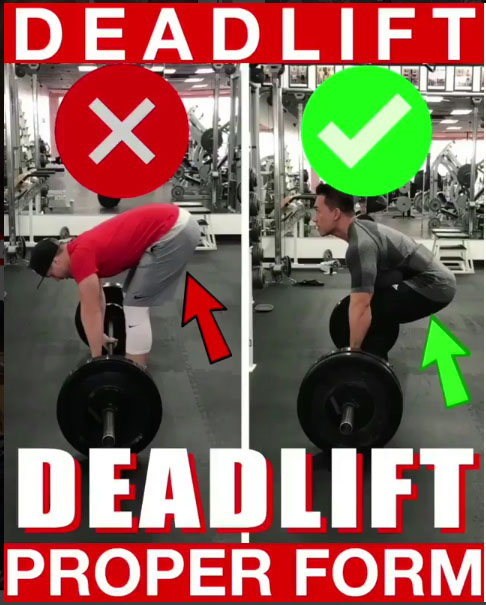
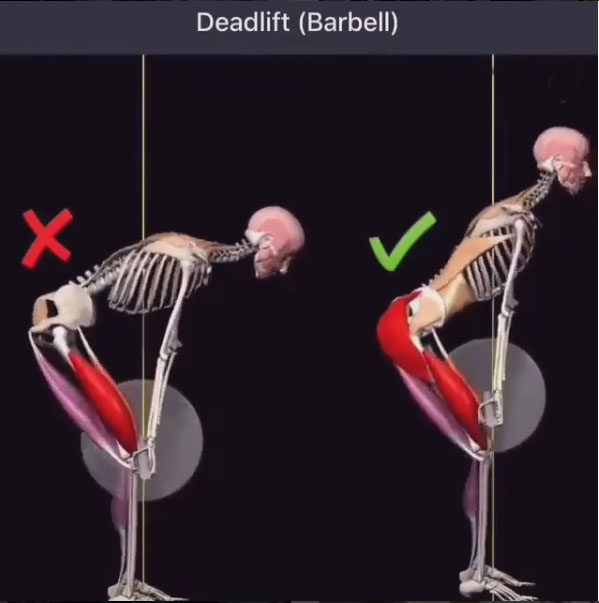
1. Preparation. Standing steadily and confidently, the legs are placed quite narrowly (that is, the width of the hips, not the shoulders), the feet are slightly deployed to the sides. The bar is located on the floor, its neck passes through the center of the foot (exactly in the center of the entire foot, not just its upper part), being as close as possible to the foot itself. The arms on the rod are also located narrowly and touch the knees.
Separately, we note that shoes with a gel / air cushion (typical running shoes) are absolutely not suitable for performing deadlift, as they create unnecessary cushioning. Gumshoes or any other footwear on a flat sole is preferable, as it is easier to maintain balance and not to allow overloads that lead to back pain.

2. Occupation of the starting position. Go down with a movement similar to squats (that is, pull the pelvis back, straightening the back) and take the bar so that the knees are inside the hands (the distance between them is about 40 cm). The hands should be as straight as possible, and the elbows should be fixed. Use a normal grip (palms look down).
Concentrate and try to feel the tension of the key muscle groups – straightened back will force the back of the hips and the muscles of the press to work. Expose the chest slightly forward, while looking strictly down – try not to turn your head to the sides, checking the correctness of the position in the mirror (this is a typical cause of pain in the neck).

3. Checking. Before directly lifting the weight, it is important to make sure that your starting position of the deadlift is ideally correct. Check the position of the feet and the proximity of the barbell to the legs (develop the habit of checking the position of the lacing on your shoes). In addition, do not go low in the squat and do not take your knees out of the line of socks.
The shoulders should slightly go forward beyond the bar line (imagine that the shoulder blades are covering the bar) – this will help evenly load the shoulder joint and avoid its overload. The head and neck should be in the most neutral position, the sight – directed downwards before itself, instead of in a mirror as we already mentioned.
4. Move up. Without swaying or transferring the weight of the body to the socks, set the chest forward and rise upward, keeping the bar of the barbell as close to the legs as possible. In the first phase of the movement (raising the barbell to the knees) the front surface of the hips participates in the work, in the second – the back surface. The back remains straight (mentally remove the pelvis back).
In the second phase of the movement, it is especially necessary to use the musculature of the buttocks and the back of the thighs, pushing the pelvis forward, and not trying to pull the weight of the pull the weight of the barbell due to the strength of the lower back. At the top point, do not perform shrug (“shrugging shoulders”) or other unnecessary movements – just lift the weight and freeze.

[wp_ad_camp_1]
5. Move down. Remember that lowering the weight down does not start at all with the bending of the knees, but with the retraction of the hips backwards – this will help to free the way for the barbell, not allowing it to hurt your knees. Lower the barbell in a similar way to the position of the kneecaps, and only after that start bending the knees themselves. Watch out and fall down on exhalation.
The spine, when moving down, should be in a neutral position – do not let the lower back arched up or down. In addition, do not carry the weight of the barbell on your hands and shoulders – this will create a serious risk of injury to the joint. Among other things, we once again remind you that your view should not fall to your feet – it will break the balance.
Errors in the execution of deadlift.
Often in the upper part of the trajectory of performing a deadlift it is recommended to strain the muscles of the back, “shrug” or even arch the lower back – remember that this is a serious mistake, contrary to the correct technique. Even the English name of the exercise – deadlift (or “deadlift”) – says that at the top you have to freeze.
The only movement that is permissible at the top point of lifting the weight is putting the chest forward, but without trying to connect the shoulder blades together or additionally strain the shoulders. Set the chest forward, stop for a second, then exhale downward with full control of the movement and tension of the muscles of the body, rather than just throw the barbell to the floor.
Deadlift for beginners.
In most cases it is quite difficult for beginners to raise the barbell directly from the floor – the smaller the working weight, the smaller the diameter of the pancakes and the lower the barbell is. Keep in mind that if you do not use 20 kg pancakes with a larger diameter, it’s better to make a deadlift from the stand (or by placing a 5-kilogram height under the main pancakes).
It is extremely important for a beginner to ensure that the loin is constantly in a neutral position. Remember that bending the back up is the easiest way to get injured. This remark is especially important when carrying out the deadlift for girls, because they tend to bend their backs not only in the lower, but also in the upper part.
Do I need insurance and belts?
The belts really help raise the weight of the barbell than can hold hands – but it’s important to remember that you are not in competition. In deadlift, it is not so much the weight of the working weight that is important, but the ideal technique of execution. That’s why the use of belts and special belts is allowed only by professionals, but not by beginners.
[wp_ad_camp_2]
This same remark applies to the technique of “diversion”, when one palm looks up, and the other – down. Such a grip facilitates the exercise, therefore, only in the most recent approaches, when the athlete has little strength. However, again, beginners are advised to first use the usual grip and adequate weights, learning technique.


