


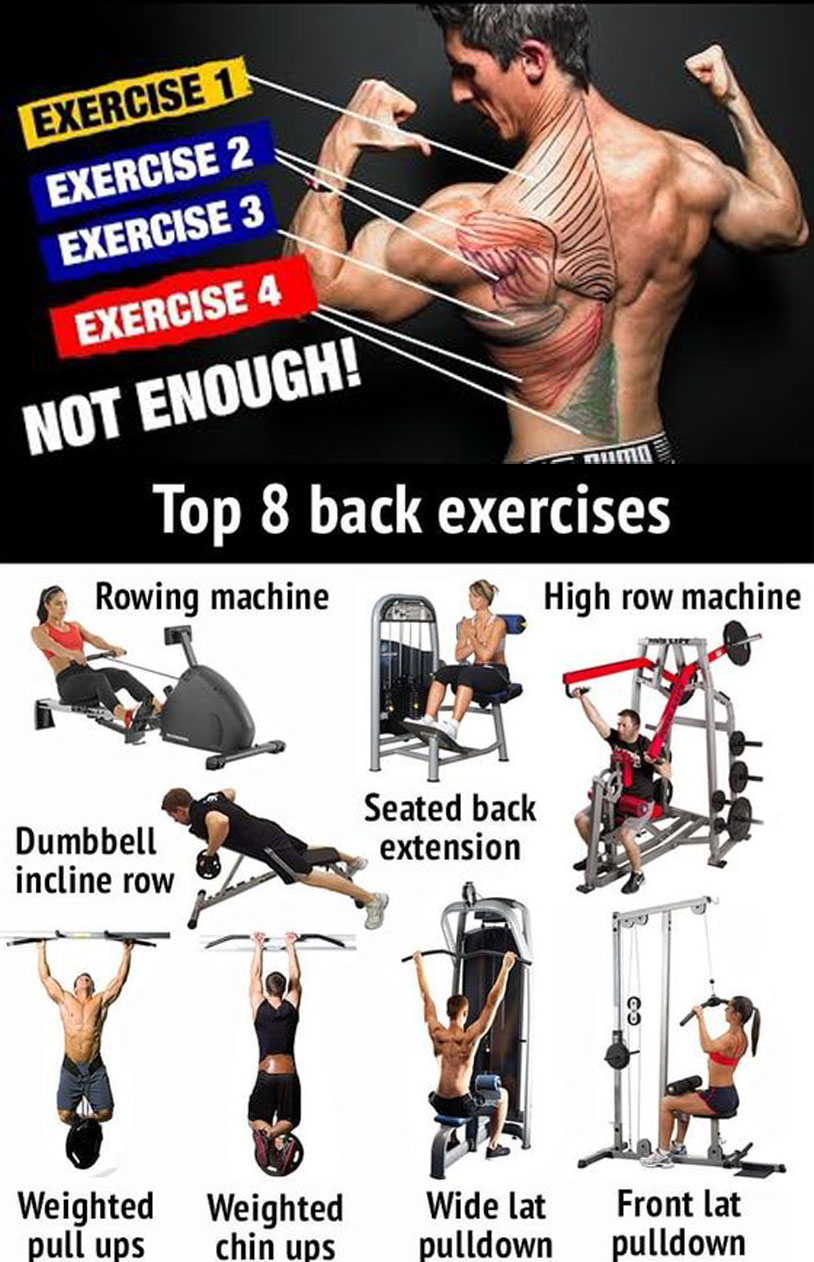
🚨 TOP 8 BACK EXERCISES👇
✅ Not all exercises are created equally – some, like compound moves, have the ability to encourage more muscle growth than others, and using this to your advantage can make you a beast in no time!
✅ Everyone, ranging from the average couch-man to the bodybuilding champion, can benefit immensely from training with compound exercises.
[wp_ad_camp_2]
[wp_ad_camp_1]
Being multi-joint movements, they work multiple muscle groups at the same time, which makes them an efficient use of your time, and equally important, they stimulate anabolic environment like nothing else. Furthermore, science has proven that compound exercises burn more calories than exercises focused on one muscle group. These bad boys also help you gain more muscle mass and strength, improve intramuscular coordination, increase the production of growth hormone (HGH), protect cardiovascular health and improve flexibility.
So, whether you’re here to explore ways to build some serious muscle, or you’re still dipping your toes in the exciting world of bodybuilding, here are 8 absolutely-must-have compound exercises and some tips to help you benefit fully from them.
1. 🚨 PULL UP / CHIN UP
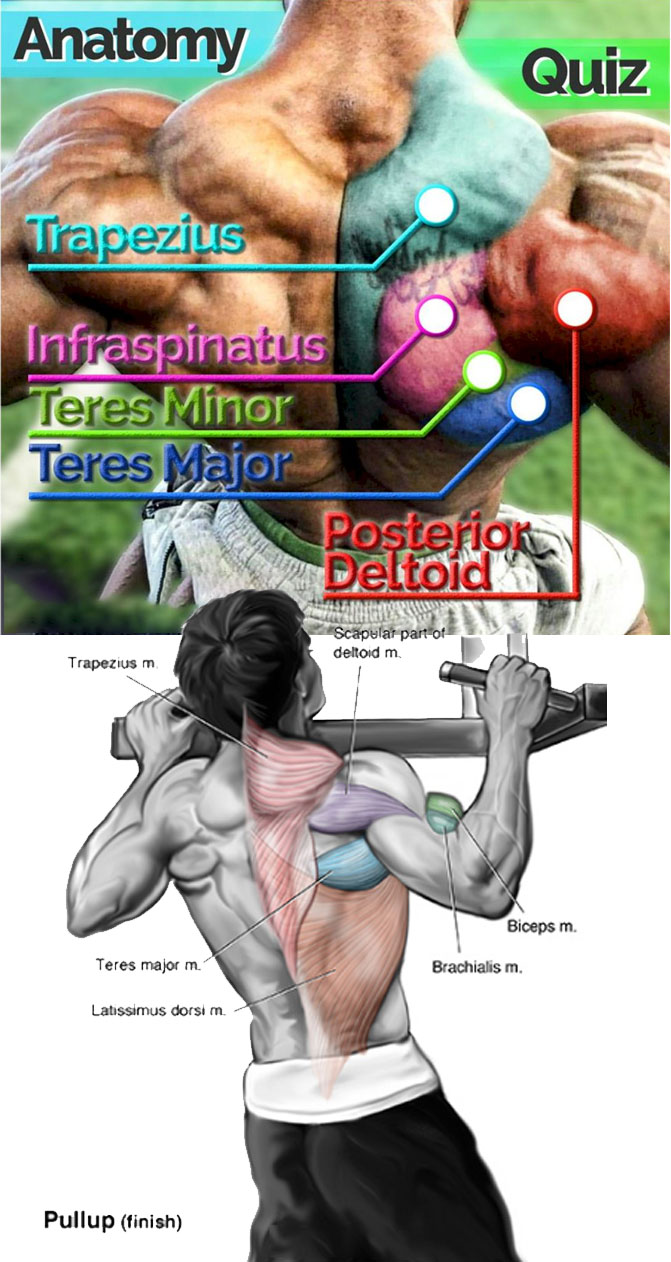
Pullups and chinups are two of the easiest exercises to perform, conceptually — all you have to do is hang from a bar and pull your chin up over it, hence the names — but they’re also some of the most effective when it comes to building pure strength. After all, you’re using your own body for resistance, no weights required (at least to start).
[wp_ad_camp_4]
🚨 Chin up and Pull up Mistakes
Despite being a technically straight forward movement, it is still possible to make a hash of this effective but demanding exercise. Here are a few of the more common faults and how to fix them…
- Failure to pull chin over the bar – likely to be either a technical fault (poor exercise habits) or a biceps weakness. Try performing chin ups instead, strengthening your biceps or using bands for assistance as described below
- Failure to fully extend the arms at the bottom – again, probably a technique fault so make a point of pausing for a second with arms fully extended between repetitions to ensure this habit is eliminated. May also be a coping mechanism for making the reps easier by reducing range of movement. It’s better to perform fewer reps using a full range of movement than more reps using a partial range of movement so no chopping your reps short as that is CHEATING!
- Kicking with the legs – sometimes called “kipping”, using the legs can create a kind of “body wave” that helps you perform more repetitions by creating momentum. CrossFit, which often prescribes high repetitions of pull ups, use kipping quite a lot. If you are doing pull ups and chin ups for developmental purposes, I suggest kipping is counterproductive as it merely takes stress off the target muscles of the lats and biceps. If, however, you are training for CrossFit then by all means add a kip but don’t forget that strict pull ups and chin ups are your bread and butter in terms of muscular development.
- Unable to do pull ups or chin ups – don’t worry as you are not alone! I’ve outlined some strategies below to help you do your first solo repetition and then increase your performance numbers.
2. 🚨 Barbell Row
[wp_ad_camp_3]
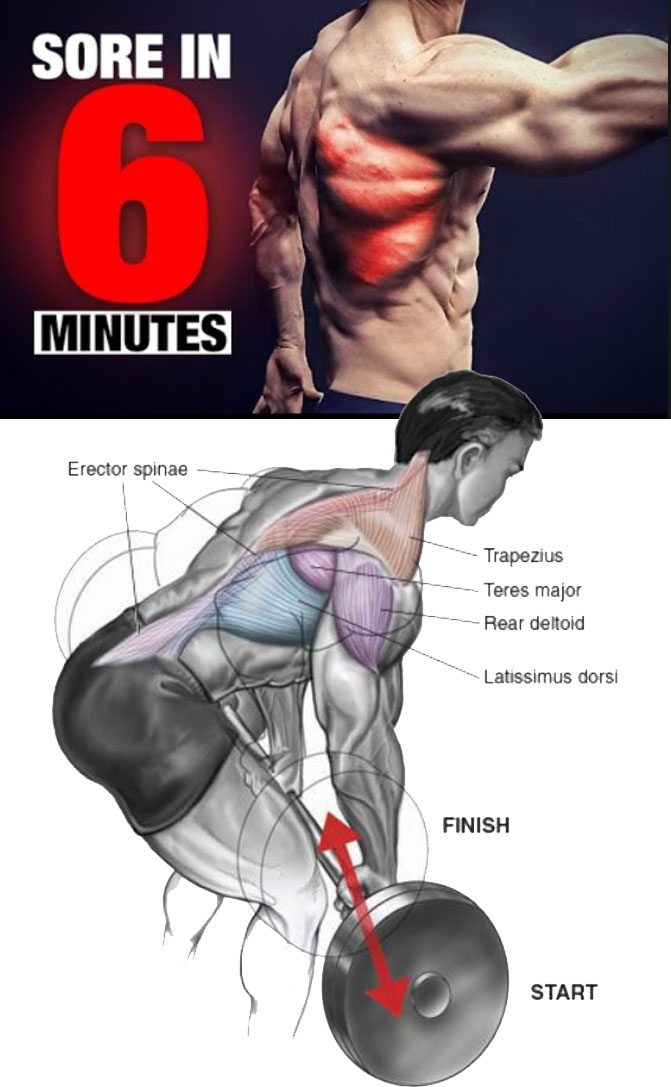
The barbell row is the typical back exercise and a reference point for all other free-weight rows. All you need to think about with this exercise is keeping your body stable while you’re pulling that bar up to your stomach. The weight should be really heavy and your grip should be pronated, with your palms facing backwards. Your torso should be anywhere between parallel to the floor and inclined at 45 degrees.
3. 🚨 Lat Pulldown Exercise Guide & Tips
Execution of lat pulldowns:
[wp_ad_camp_5]
1. Grab the bar with a grip that is wider than shoulder width and palms facing forward. Note that there is also a close grip lat pull down where you grab the bar at shoulders width.
2. Sit on the seat and make sure your legs are sitting comfortably under the support rollers and place feet firmly on the ground. At this point the weight in the stack goes up.
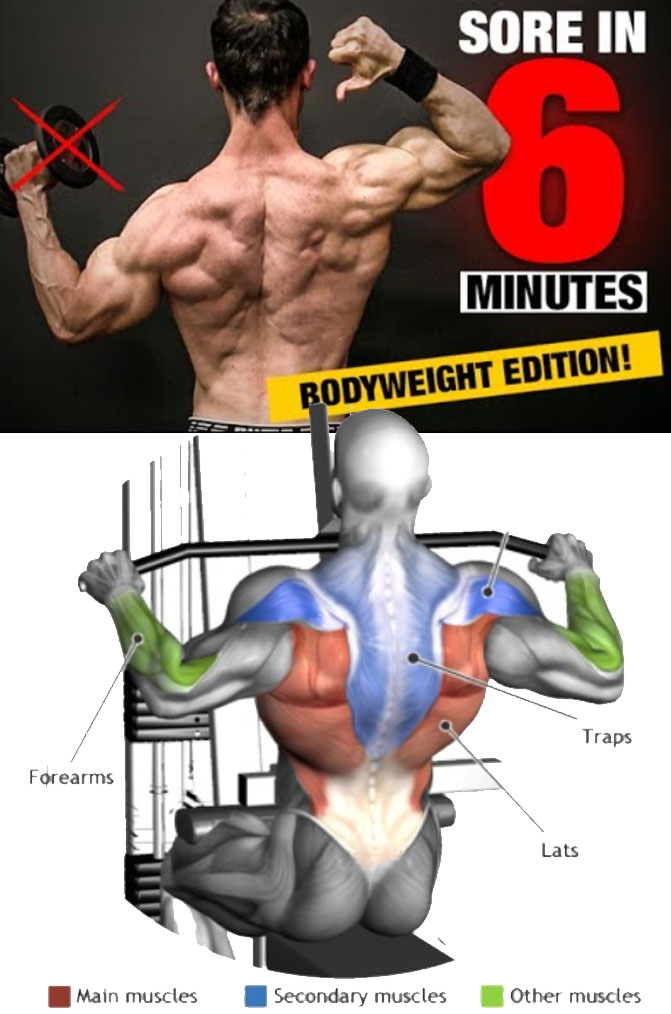
3. Straighten your back and without leaning back pull the bar until it touches your chest. Concentrate on squeezing the back muscles once you are in this position. Stay in this position for a couple of seconds for a maximum contraction. You should exhale during this part of the movement.
4. After a couple of seconds of contracting your shoulder blades together, slowly raise the bar back to the starting position until your arms are fully extended and the back muscles are fully stretched. Inhale during this part of the movement.
5. Repeat the movement for X number of repetitions.
4. 🚨 Dumbbell Row
The dumbbell row has the same motion as the barbell row, but when you use dumbbells you have a slightly extended range of motion when you get to the top of the movement because the bar is not hitting your abdomen. When using dumbbells, you can use a neutral hand position with your palms facing inwards, which will activate your back muscles a bit differently, and you can use a reverse grip too! Switching up your exercises means your muscles grow in new ways, so do it as much as possible!
[wp_ad_camp_2]
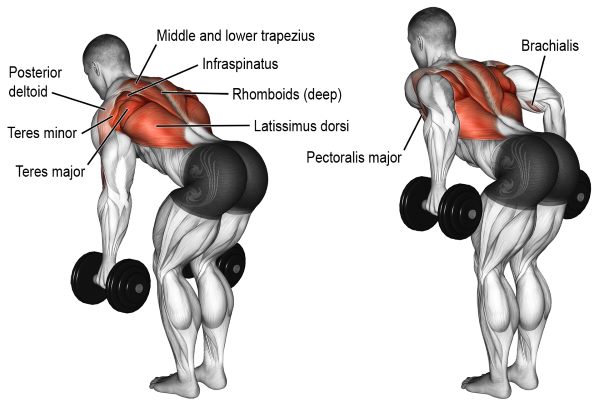
To perform this exercise, take two dumbbells and stand with slightly bent knees. Bend over at the waist until you are either parallel to the floor or at a 45 degree inclination to it. The dumbbells should be hanging down with your hands fully extended and your palms facing each other. Keep this angle and pull both of the dumbbells up together until they reach your waist. For a full contraction in your back, squeeze your shoulder blades together when you get to the top, then extend your arms towards the floor again. Do this exercise first on back day because your lower back will suffer the same amount as with a barbell.
5. 🚨 One-Arm Dumbbell Row
The one-arm dumbbell row is popular because it allows you to isolate certain muscles, but also because this version gives you a full range of motion. You can use the one-arm dumbbell row to balance out the sides in your back, so do it more extensively on your weaker side. Also, because you have a bench to support yourself on with your knee, you can devote more attention to lifting instead of keeping your torso in the correct form all the time. This exercise is a minimal risk for injury to your lower back when performed with proper form!
[wp_ad_camp_1]
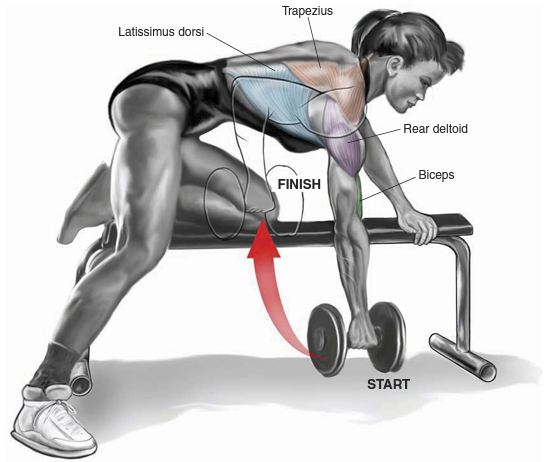
To do it, bend your leg at the knee and put it on a bench along with the hand on the same side of the leg. Your other foot should be on the floor and the hand at that side should have a dumbbell in it. Bend your waist until you are parallel to the floor and your head facing downwards, as well as your dumbbell in your extended arm in your inwards-facing palm. Your chest should point to the floor. Lift the dumbbell by contracting your back muscles and bend your elbow. When you get to the top of the movement, make sure to squeeze your shoulder blades and slowly put the dumbbell back in its original position. Don’t switch arms until you complete all the reps with one arm, hence the name! You can do this exercise at any point during your back workout – as the first one with a really heavy weight or as the last one with a light weight and high reps.
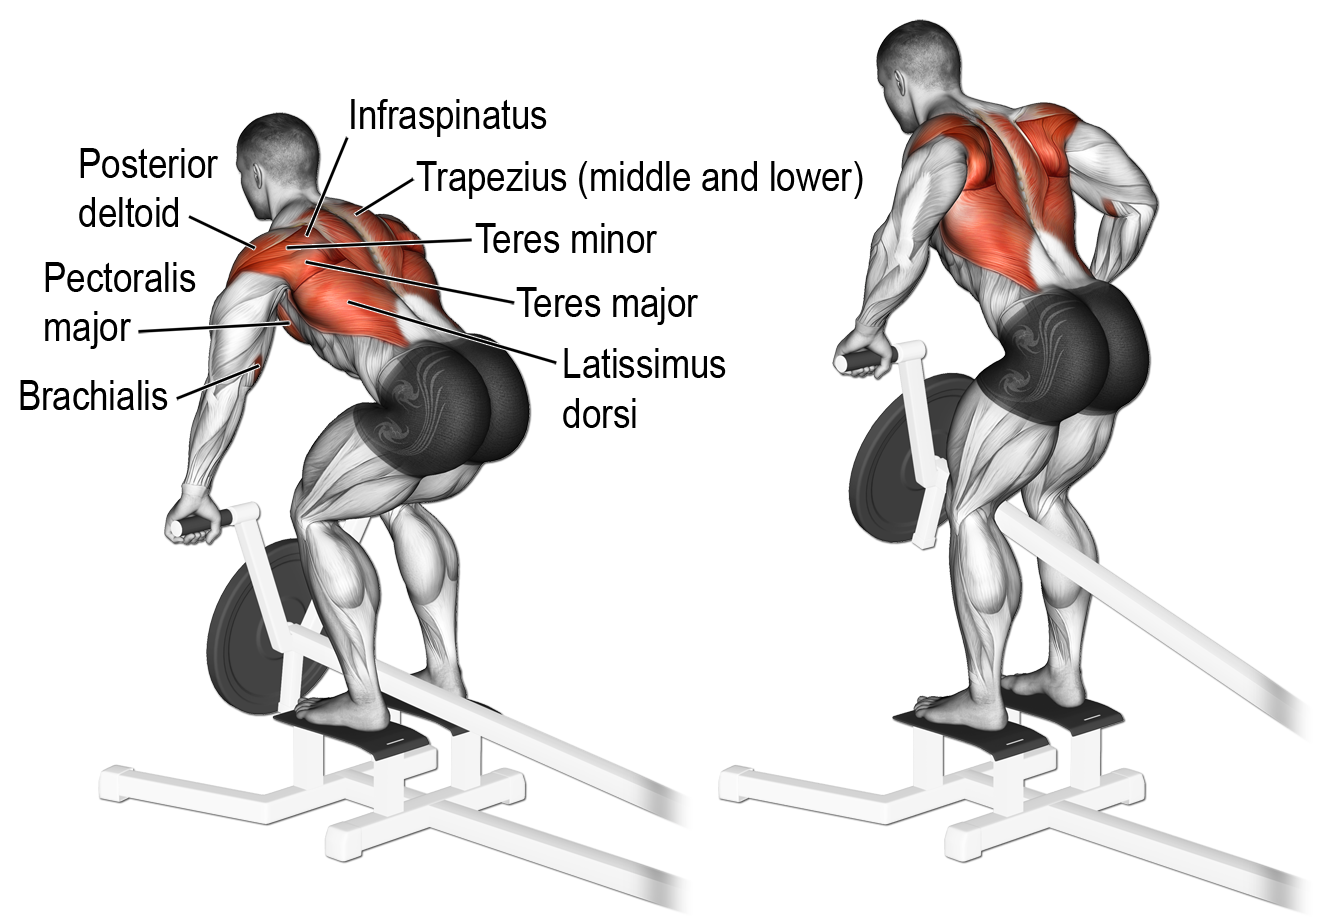
6. 🚨 Prone Incline Bench Row
Find a bench that has enough clearance to the floor to extend your arms with a dumbbell in them. This will often be an incline bench as flat benches don’t generally offer that type of space, unless it’s a high flat bench. Lie down on it, facedown and extend your arms with two dumbbells in them and your palms both facing each other. Squeeze your back muscles and lead with your elbows, pulling the weights up. When they reach your torso, contract your shoulder blades and lower the dumbbells back down. Do this exercise as the last multi-joint exercise in your back workout. If you’re planning on doing a single-joint move after it, such as straight-arm pull-downs, this would be before it, but in all other cases, leave it for last!
7. 🚨 T-Bar Row
This is the machine version of the normal barbell row, which means you can also do it on a Smith machine. It will be the same motion, but because the weight is set on a fixed path, you don’t have to spend extra energy stabilizing yourself. While some people say this diminishes the T-bar row’s functionality, it also lets you overload your large target muscles like your middle traps, rhomboids and laterals even more! This is because it doesn’t depend on stabilizing muscles.
[wp_ad_camp_4]
So, with all that said and done, here is a complete back workout based on rows.
- Barbell Rows for 4-5 sets, 6-8 reps each.
- Lat Pulldowns for 4 sets, 10 reps each.
- T-Bar Rows for 3 sets, 12 reps each.
- One-Arm Dumbbell Rows until burnout with 30 reps per side.
Also, you can switch some exercises up. Doing this allows your muscles to grow beyond their limits when you only work on them with one set of exercises.
- Instead of overhand barbell rows, you can do reverse-grip barbell rows or dumbbell rows.
- Instead of one-arm dumbbell rows, you can do prone incline dumbbell rows. When doing this, do 2-4 sets of 15-20 reps each.
- Instead of T-bar rows, you can do one-arm dumbbell rows, if you want to finish with prone incline rows. When doing one-arm dumbbell rows earlier in the routine, do three straight sets of 12-15 reps.
- Remember to alternate your rowing movements, so every other workout you can do two instead of three rowing movements. When doing this, you can add a pull-down movement or some pull-ups, but that means you will also have to do them first in the back workout!
8. 🚨 PERFORM MACHINE LOW ROWS
1. First adjust the weight you want to use, and get yourself seated in the rowing machine. Adjust the seat height, so that the handles are the height of the lower robs when you pull them toward your chest. Your legs should be slightly bent at the knees. Make sure that you sit far enough so that the handles are just in jour reach. This will allow you to perform a greater range of motion.
[wp_ad_camp_3]
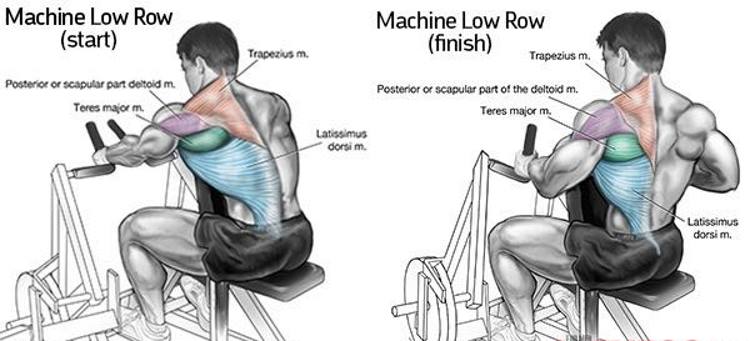
2. Grab the handles, and secure your feet on the supports. Slightly arc your back and secure yourself into position. Inhale.
3. Start pulling the handles towards your chest with the whole arm. Your elbows are pointing backwards. Continue with the movement and bring the handles to your chest. They should be at the height of the lower ribs. Inhale during this movement.
4. Once in this position let your elbow extend and start slowly lowering the weights until your arms are straight. Do not let the weights pull you down, but resist them as your lower them. Exhale during this movement.


